
Curious if you can use serger thread on a regular sewing machine? You’re in the right place to find out! Serger thread, designed for overlock machines, offers unique benefits such as cost-effectiveness and finer seams, but can it transition to your standard sewing setup?
In this guide, we’ll explore how serger thread can be effectively used on a regular sewing machine. Learn about the necessary adjustments, including using a thread stand, adjusting tension settings, and selecting the right needle.
We’ll also discuss potential challenges and provide tips to ensure a smooth sewing experience. Discover how to integrate serger thread into your sewing projects and make the most of its advantages today!
Understanding Serger Thread
Serger thread, specifically crafted for use in overlock machines (sergers), is distinguished by its finer texture and larger spool size compared to regular sewing machine thread.
This specialized thread excels in creating strong, neat edges and seams, making it ideal for finishing fabric edges and achieving a polished look in garment construction.
Unlike the smaller spools used for standard sewing machines, serger thread is typically found on large cones, essential for the high-speed stitching typical of sergers.
Comparison with Regular Sewing Machine Thread
Serger thread differs from regular sewing machine thread in thickness and spool size. Explore these key differences to understand how they impact your sewing projects effectively.
Thickness
Serger thread is notably finer than regular sewing machine thread. This finer texture allows for more precise stitching and a smoother finish, particularly on lightweight or delicate fabrics. By contrast, regular sewing threads are thicker and are designed for general stitching purposes.
Spool Size
Serger thread comes on larger cones, which contain significantly more thread than the smaller spools used in regular sewing machines. This larger spool size supports the extensive use required for serger stitching and reduces the frequency of thread changes during long sewing sessions.
Benefits of Serger Thread
Serger thread offers significant advantages, including cost savings, extended supply, and smoother seams. Discover how these benefits can enhance your sewing projects and streamline your process.
Cost-Effectiveness
Serger thread offers substantial cost savings, especially when purchased in bulk on large cones. This is particularly beneficial for extensive projects or for avid sewers who require a significant amount of thread.
Bulk purchasing reduces the cost per yard compared to buying multiple smaller spools of regular sewing thread.
Finer, Smoother Seams
The finer nature of serger thread contributes to smoother and more refined seams. This feature is particularly advantageous for sewing lightweight or delicate fabrics, where a finer thread ensures a professional and polished finish.
The reduced bulk of serger thread enhances the overall appearance of the seam, providing a clean and finished look.
Longer Thread Supply
Thanks to its larger cones, serger thread provides a longer thread supply compared to regular spools. This extended supply minimizes the need for frequent thread changes during lengthy projects, allowing for uninterrupted sewing. The larger cones help maintain workflow efficiency and reduce interruptions.
Can You Use Serger Thread on a Regular Sewing Machine?
Yes, serger thread can be used on a regular sewing machine. Although it is designed specifically for overlock machines (sergers), adapting serger thread for use with standard sewing machines is entirely possible with a few adjustments.
By making these necessary modifications, you can leverage the benefits of serger thread, such as its finer texture and cost-effectiveness, in your regular sewing projects.
Necessary Adjustments
To use serger thread on a regular sewing machine, necessary adjustments include setting up a thread stand, matching bobbin thread, and fine-tuning tension and needle size.
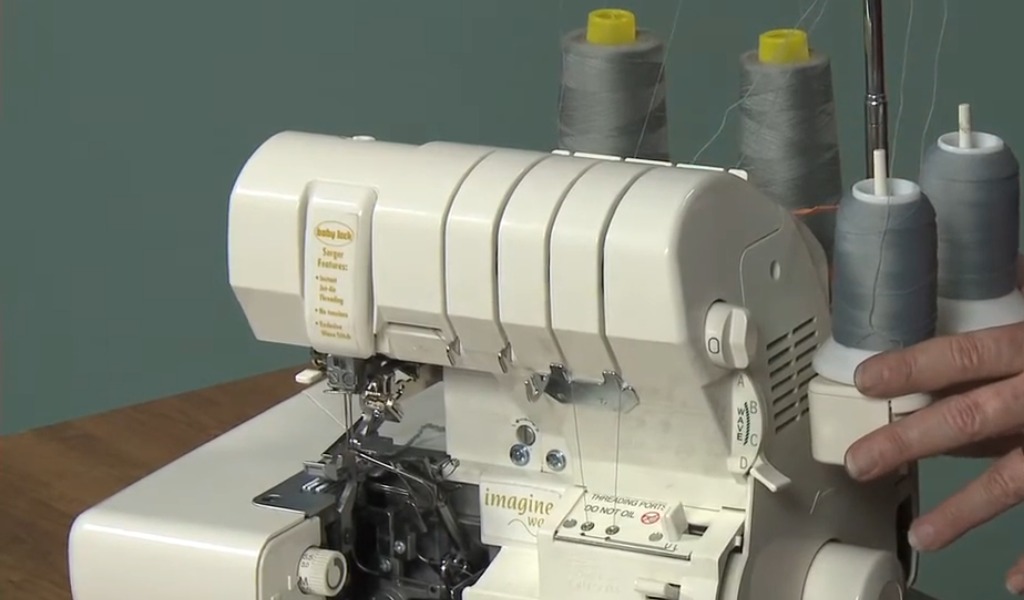
Thread Stand
To start, you will need a thread stand for the large cones of serger thread. Since serger thread comes on larger cones that don’t fit the standard spool pins on most sewing machines, a separate thread stand is crucial. This stand supports the cone and ensures smooth, tangle-free thread delivery.
If you don’t have a commercial thread stand, you can use DIY solutions such as a cup, a paper towel holder, or even a CD spindle to hold the cone in place.
Bobbin
Next, ensure you use a regular sewing machine bobbin filled with serger thread. It’s essential that the thread in both the top spool and the bobbin match to maintain consistent stitching and tension.
Filling the bobbin with serger thread helps prevent issues such as thread jams or irregular stitch quality, ensuring that the machine’s bobbin and thread system work harmoniously.
Tension Settings
Adjusting the tension settings on your sewing machine is another critical step. Serger thread is finer than regular sewing machine thread, so you’ll need to experiment with different tension levels to achieve balanced stitching.
Proper tension adjustment helps prevent common issues like loops on the underside of the fabric or puckering on the top, ensuring smooth and even stitches.
Needle Size
Selecting the right needle is also important. Choose a needle that matches the weight and type of fabric you are working with, as well as the finer serger thread.
Generally, a smaller needle size is suitable for finer threads, helping to avoid problems such as needle breakage or skipped stitches. Using the appropriate needle ensures compatibility and enhances the stitching process.
Step-by-Step Guide to Using Serger Thread on a Regular Sewing Machine
Discover how to seamlessly use serger thread on your regular sewing machine with our step-by-step guide. Follow these instructions to enhance your sewing projects with fine, cost-effective thread.
Gather Your Supplies
Begin by assembling all necessary supplies. You will need serger thread on a large cone, a separate thread stand (if your machine does not have one), a regular sewing machine bobbin, and a needle appropriate for your fabric and the finer serger thread.
Having everything ready will streamline the setup process and ensure you are prepared for a smooth sewing experience.
Set Up the Thread Stand
Next, position the thread stand behind or beside your sewing machine. Since serger thread typically comes on large cones that won’t fit the spool pin on a standard sewing machine, the thread stand provides the necessary support.
Ensure the stand is stable and the cone spins freely, which will help prevent tangling and ensure consistent thread flow.
Install the Serger Thread Cone
Place the serger thread cone onto the thread stand. Make sure the cone is properly seated and can rotate without obstruction. This setup allows the thread to feed smoothly into your sewing machine, minimizing the risk of snags or tangles during sewing.
Wind a Regular Sewing Machine Bobbin
Wind a regular sewing machine bobbin with serger thread. You can match the bobbin thread color to the top spool or choose a different color based on your project’s needs.
Filling the bobbin with the same thread as the top spool ensures that the thread tension remains consistent, leading to more even stitching.
Install the Bobbin
Insert the filled bobbin into the bobbin case of your sewing machine. Follow the instructions in your sewing machine manual to ensure proper installation. Proper placement of the bobbin is crucial for smooth thread flow and consistent stitch quality.
Thread the Sewing Machine
Thread the serger thread through your sewing machine according to the threading path specified in your machine’s manual. Ensure the thread passes through all guides and tension disks correctly.
Accurate threading is essential for achieving balanced stitches and avoiding common issues such as skipped stitches or thread breakage.
Adjust Tension Settings
Since serger thread is finer than regular sewing machine thread, you will need to adjust the machine’s tension settings. Start by lowering the tension slightly and test the stitches on a scrap piece of fabric.
Gradually make adjustments until you achieve balanced stitches without loops or puckering. Proper tension ensures a smooth and professional finish.
Choose the Right Needle
Select a needle that is appropriate for both the fabric you are using and the finer serger thread. Generally, a smaller needle size works well with finer threads. Choosing the right needle prevents issues such as needle breakage and ensures that the thread feeds smoothly through the fabric.
Test Stitches
Before starting your actual project, test the serger thread on a scrap piece of fabric. This testing phase allows you to check for any tension problems, skipped stitches, or other potential issues. Make any necessary adjustments based on the test results to ensure optimal performance during your project.
Make Adjustments as Needed
If you encounter any issues during the test stitches, be prepared to make further adjustments. This may involve rethreading the machine, changing the needle size, or tweaking the tension settings. Addressing these issues early on will help ensure that your sewing project proceeds smoothly.
Start Your Project
Once you have successfully tested the serger thread and made any necessary adjustments, proceed with your sewing project. Enjoy the benefits of using serger thread, such as its cost-effectiveness and finer seams, and achieve high-quality results in your sewing endeavors.
Advantages of Using Serger Thread on a Regular Sewing Machine
Discover the benefits of using serger thread on a regular sewing machine. From cost savings to smoother seams, explore how this versatile thread enhances your sewing projects effectively.
Cost-Effectiveness
One of the primary benefits of using serger thread on a regular sewing machine is its cost-effectiveness. Serger thread is often sold in larger cones, which generally offers a lower cost per yard compared to buying multiple smaller spools of regular sewing thread.
This bulk purchasing option is ideal for extensive projects or frequent sewing tasks, allowing you to save money while ensuring you have a sufficient supply of thread.
Extended Thread Supply
Serger thread comes on large cones that provide a significantly longer thread supply compared to the smaller spools used in standard sewing machines.
This extended supply reduces the frequency of thread changes during long sewing sessions, helping you maintain a steady workflow without constant interruptions. The larger thread quantity is especially beneficial for large-scale projects or when working on multiple garments.
Finer, Smoother Seams
The finer texture of serger thread contributes to creating finer and smoother seams. This is particularly advantageous when working with lightweight or delicate fabrics, where a finer thread ensures a more polished and professional finish.
The reduced bulk of serger thread helps in achieving a clean, refined seam that enhances the overall appearance of your sewing projects.
Availability in Various Colors
Serger thread is available in a range of colors, which can be useful for projects requiring specific color matches. While the color selection may not be as extensive as that of regular sewing threads, serger thread still offers a variety of options that can suit different fabric and project needs.
Having access to a range of colors allows for greater flexibility and creativity in your sewing projects.
Enhanced Project Versatility
Using serger thread on a regular sewing machine opens up new possibilities for your projects. It allows you to take advantage of serger thread’s benefits, such as its cost savings and finer seam quality, even if you don’t own an overlock machine.
This versatility enables you to achieve professional-looking results across a wide range of sewing applications without needing additional equipment.
Increased Efficiency
By reducing the frequency of thread changes and providing a longer continuous thread supply, serger thread enhances sewing efficiency.
This efficiency is particularly valuable during extensive sewing tasks, where maintaining an uninterrupted workflow can significantly improve productivity and overall project satisfaction.
Potential Issues and Considerations
When using serger thread on a regular sewing machine, you might encounter potential issues like tension problems and reduced strength. Address these considerations to ensure optimal stitching performance.
Tension Problems
When using serger thread on a regular sewing machine, one of the most common issues is adjusting the machine’s tension. Since serger thread is finer than regular sewing machine thread, you might encounter tension imbalances, which can lead to problems like loops on the underside or puckering on the top.
To address this, you will need to experiment with different tension settings until you achieve balanced stitches. Testing on a scrap piece of fabric can help you find the right tension adjustment before starting your actual project.
Reduced Strength
Serger thread, being finer, may not be as strong as regular sewing machine thread. This reduced strength can be a concern when working with heavy fabrics or projects that experience a lot of stress on the seams.
For such projects, consider using regular sewing thread or a stronger thread designed for heavy-duty use to ensure durability and longevity of the seams.
Color Mismatches
Another potential issue is color mismatch. While serger thread is available in various colors, the range may not be as extensive as that of regular sewing machine threads. This limitation might pose challenges in achieving precise color matches for your projects.
To mitigate this, plan ahead and select colors that closely match your fabric or opt for a neutral thread color that blends well with different fabrics.
Needle Compatibility
Choosing the right needle is crucial when using serger thread. The finer texture of serger thread typically requires a smaller needle size. Using an inappropriate needle size can lead to problems such as needle breakage or skipped stitches.
Ensure that you select a needle suited to both the serger thread and the fabric you are working with to prevent these issues and achieve smooth stitching.
Thread Stand Stability
If you’re using a DIY thread stand, it’s important to ensure that it is stable and secure. An unstable thread stand can cause the thread to tangle or break, leading to interruptions in your sewing process.
Make sure your thread stand is well-positioned and capable of supporting the large cone of serger thread without wobbling.
Machine Adjustment
Finally, keep in mind that using serger thread may require additional adjustments to your sewing machine settings. Aside from tension, you may need to fine-tune other settings, such as stitch length and width, to accommodate the finer thread.
Be prepared to make these adjustments and consult your sewing machine’s manual for specific guidance.
Leave a Reply